November 15, 2023 | Cold Emailing Strategies | Featured Article
Hey! Ready to supercharge your cold email skills? You're in the right place. We’re cutting through the noise to give you the best of cold emailing tactics. No jargon, just simple, effective steps that work. Let's get started and turn those emails into responses!
t's designed for any skill level, offering a clear, step-by-step approach to mastering the art of cold emailing. (Just send this article to your VA as an instruction manual to follow). I use Microsoft Office 365 in this guide, however it will serve well whatever platform you have.
From setting up domains to craft compelling subject lines & personalizing email content, we cover it all. Encourage your VAs to dive into this guide – it's a game-changer for anyone tasked with driving engagement and lead generation through email.
We'll use in this guide:
Checklist
To effectively send emails, you need an inbox such as someone@your-domain.com. Be aware that if your domain (or Server IP for cPanel inboxes) is blacklisted, your efforts are in vain as your emails will likely end up in spam, not inboxes.
To prevent this, let's check your domain (or IP) in two steps:
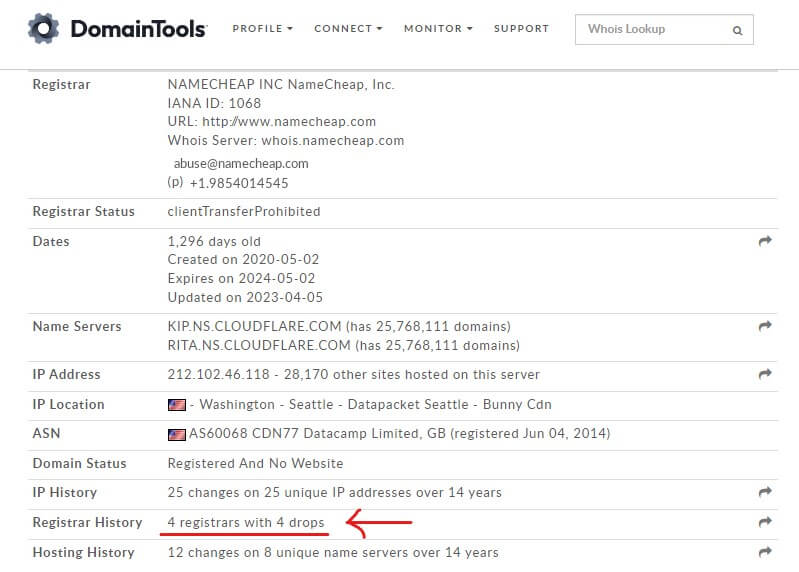
Opt for a fresh domain – it's a smart move. Start by picking a domain name and then check if your chosen domain has any Registrar History. Skip the domain, if it has registrar history.
Take a look – if you see something like 4 Registrar Changes, it's a red flag. This could indicate whether someone has previously burned your domain.
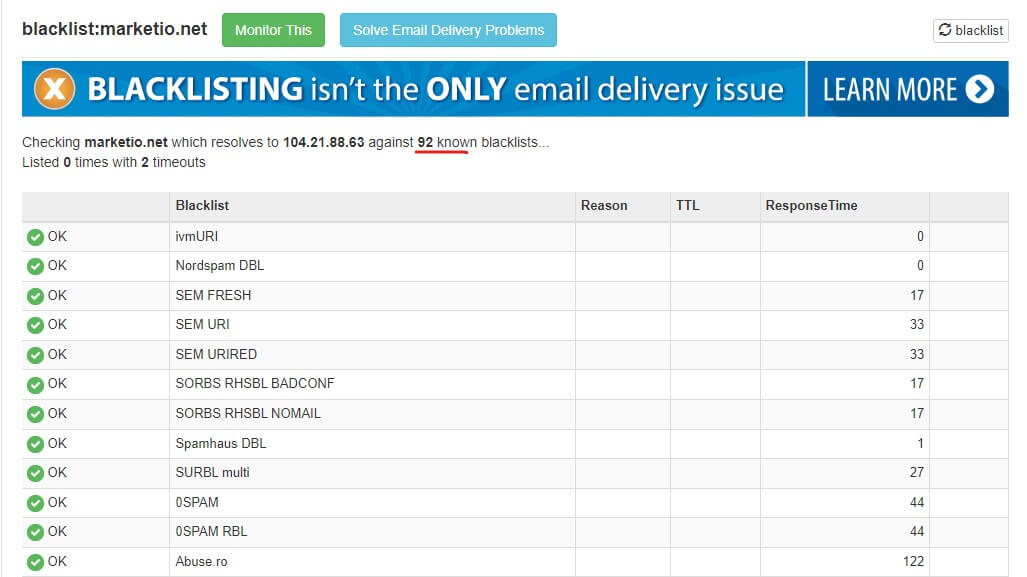
The next critical step is to ensure that your domain isn’t on any blacklists. Email providers use these lists to flag potential risks in advance, saving their resources from being expended on suspect domains.
2. The next step is crucial: verify whether your domain is on any blacklists. For instance, when you check a domain like 'Marketio.net' against 80+ blacklists, you can confidently see that it's not listed by any blacklist providers.
This step is key to ensuring your domain's integrity for email campaigns. (You can skip this step, if you bought a fresh domain)
Important Note: Don't worry if your domain is listed in Semfresh or similiar lists just because for newly registered domain (As new domains are automatically placed in this list). Your domain will be taken out after expiry of 5 days (for Semfresh).
These are most important blacklists to consider (Swipe right to left):
One of the most well-known and widely used blacklists. It includes several lists, like the SBL (Spamhaus Block List), XBL (Exploits Block List), and PBL (Policy Block List).

It focuses on blacklisting URLs that have been reported in unsolicited messages. It's unique in that it targets the content of the email rather than the sender's IP address.
This service offers a comprehensive set of lists, including spam sources, open relays, and other email-related issues.
Operated by Barracuda Networks, this list is known for its accuracy and is used by many mail servers for filtering spam.
These are "Domain Block Lists" that focus on the domains found within the body of the email, which is helpful in identifying phishing and spam emails.
This is a service where recipients can report spam, which then gets used to generate the SpamCop Blocking List (SCBL).
A lesser-known but effective anti-spam DNSBL service that is used by some ISPs and large corporations.
You can checkyour domain on more than 80+ domains from MXtoolbox here:
Now that you've verified your domain is clear of any blacklists or suspicions, we're all set to move on to the next step. Let's keep the momentum going!
Checklist
You want to make sure your emails always land right in the inbox? Just follow these simple guidelines for the best deliverability:
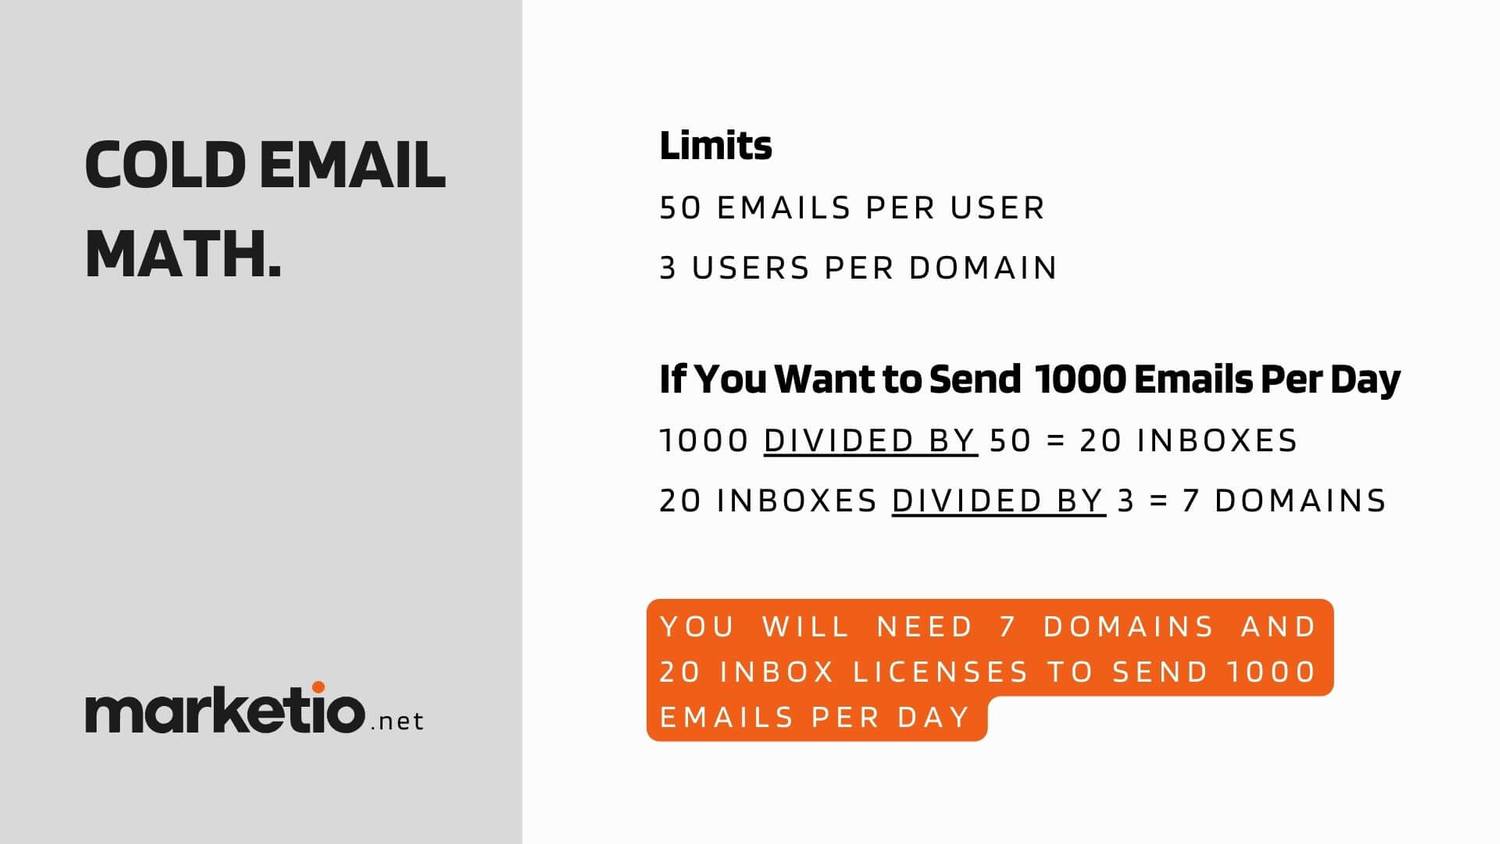
Let's suppost you're aiming to send 1000 emails a day, here's what you'll need:
Stick to these tips, and you'll be an email-sending superstar in no time!
You can register your domains from:
User inbox is basically a license for one user on your domain, which you can get from Microsoft or Google. You might be tempted to create users via cPanel hosting, but I'd advise against it. Most hosting providers are too keen on their servers being used for unsolicited (cold) emails and might block your account. Plus, if it's a shared server, there's a high chance the IP has already been overused (or 'burned') by others, meaning your emails are more likely to end up in spam.
Checklist
Ever wondered why we're all in on Cloudflare and not just sticking with our domain provider for DNS records? There are loads of reasons, but let's zero in on two big ones for now.
First up, let’s talk about speed. With Cloudflare, there’s no endless waiting around for DNS records to propagate (to inform the entire internet of our current Domain settings). We’re talking minutes, not hours, which means we can jump right into our next steps without any pesky downtime.
And second, it’s all about streamlined control. Managing all our domains becomes a breeze with Cloudflare. We keep things tight and secure without needing to give away access to our domain provider. Plus, we can safely bring our Virtual Assistants into the loop without a hitch.
We’ll get into the nitty-gritty of advanced security features, SSL, firewalls, and how it all plays a role in reducing spam flagging later on.
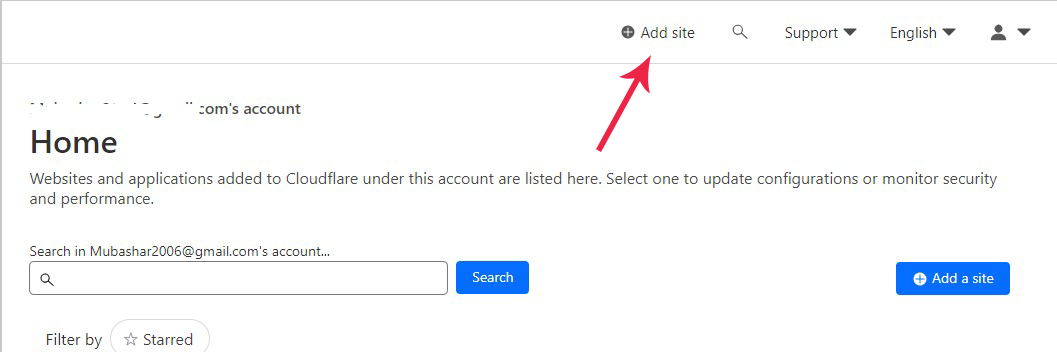
1. Register for Cloudflare.com and verify your domain. It's easy under 2-minute task. Now login to your dashboard.
2. After logged in, you will see dashboard like this (below image). Now click "Add Site" (as shown by arrow)
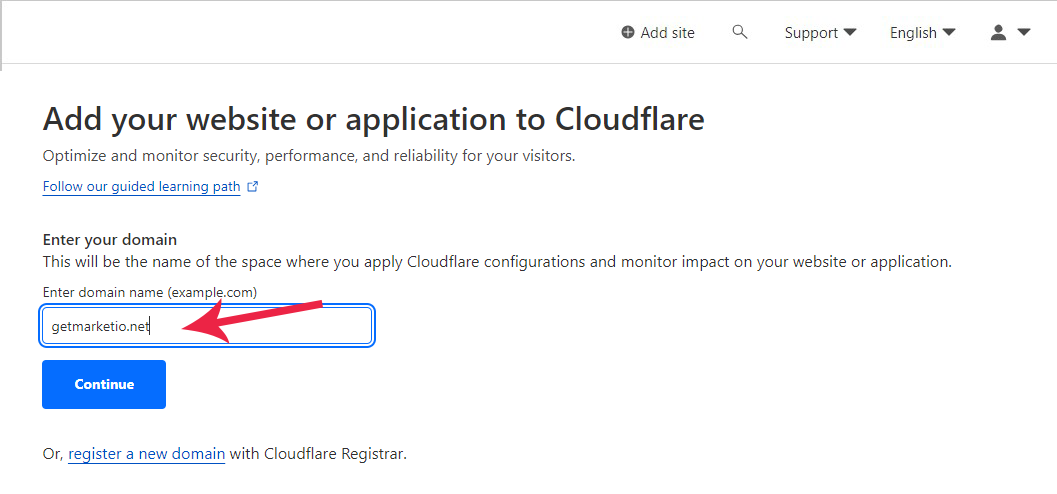
3. Now type your domain and click "Continue"
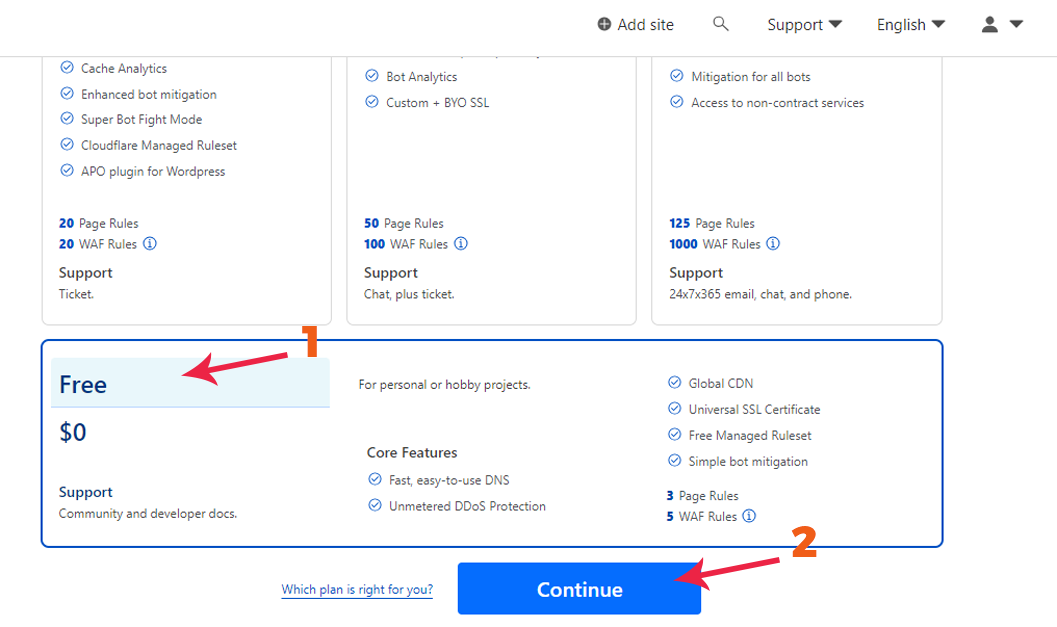
4. Now scroll down and click the "Free" option available and then click "Conitnue".
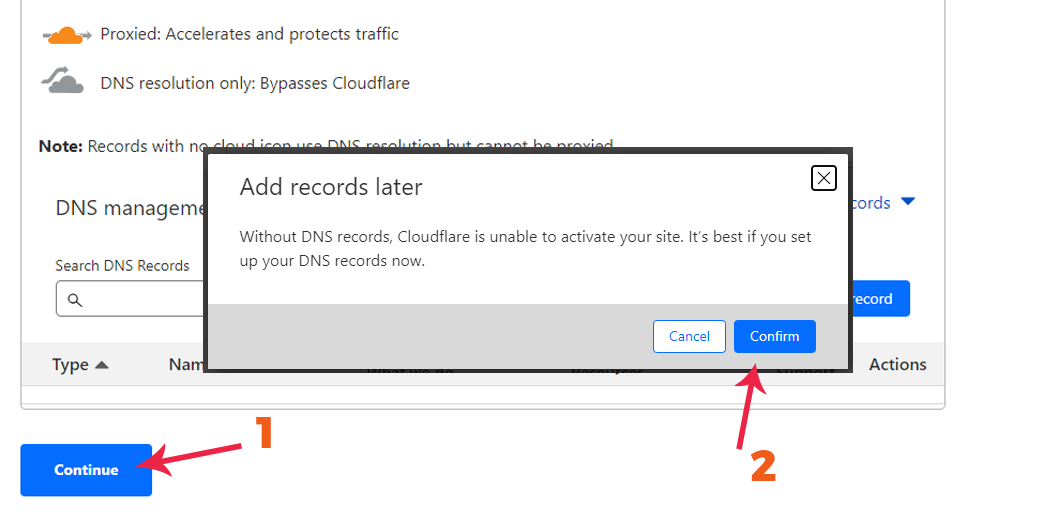
5. You may encounter this page (as there are no records on your domain). Or you may have already some records. You just click "Continue" until we get our destination.
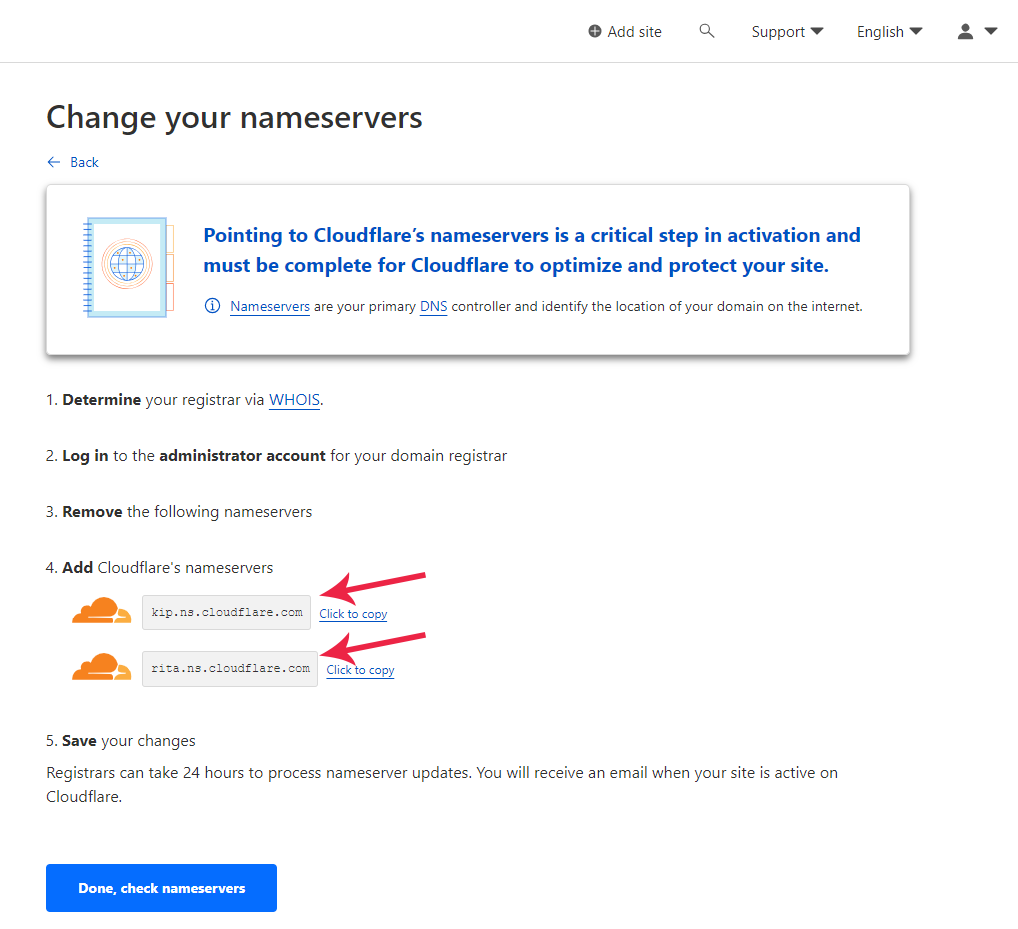
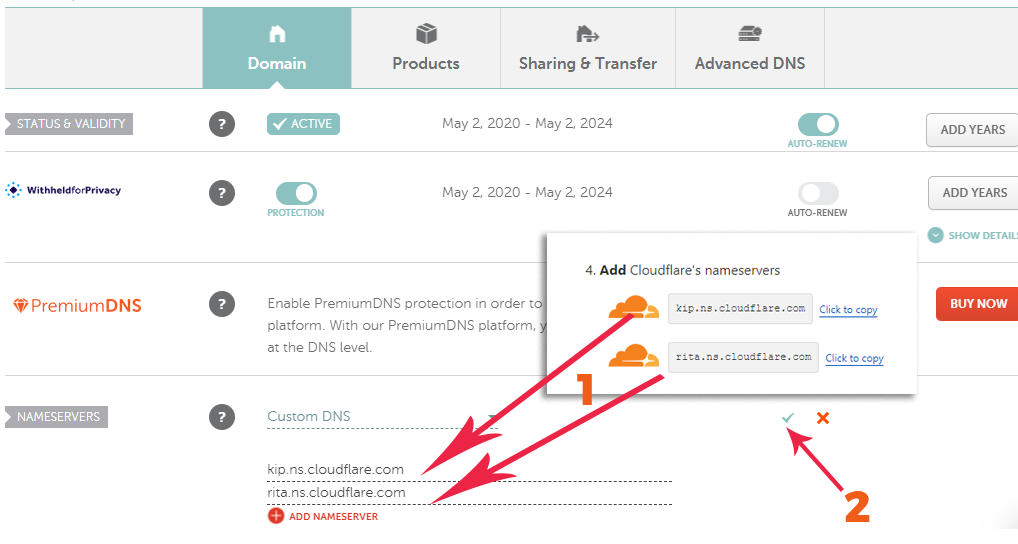
6. Our aim is to reach this page (destination), showing the nameservers. We just need to copy these two nameservers, and update our domain with these two.
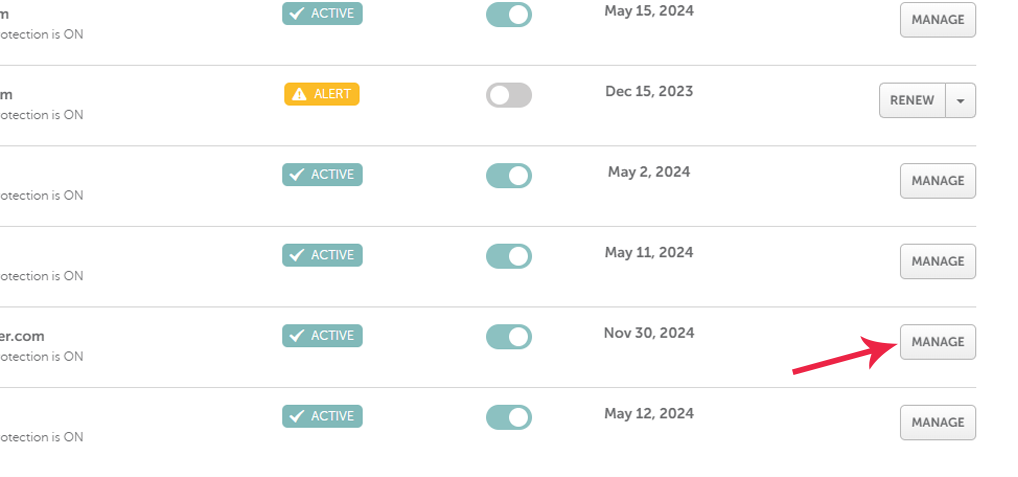
7. If you buy your domain from namecheap.com, just go to this url after login to Namecheap: https://ap.www.namecheap.com/domains/domainlist or click "Domain List" tab on your Namecheap Dashboard. Search for domain which you entered in Cloudflare and click "Manage" button
8. Now update the "Nameservers" provided by the Cloudflare as shown in the pic and click "Green Checkmark" to save it.
You have done this step succesfully. Just wait for the connection. Cloudflare will also email you about the addition of the domain to your Cloudflare account.
Copyright © 2022. All rights reserved.